How To Reconstitute Peptides?
Look, I get it.
You finally got your hands on some quality peptides. You’re excited. You’re ready to start seeing results.
And then you open the package and see… a vial of white powder.
Now what?
Here’s The Deal: Peptides Don’t Come Ready To Use
They ship as freeze-dried powder (fancy term: “lyophilized”) because that’s how they stay stable during shipping and storage.
Think of it like instant coffee – except instead of making a morning beverage, you’re about to unlock a compound that could literally change your life.
But just like you can’t just eat instant coffee crystals straight from the jar (well, you COULD, but why would you?), you can’t use peptide powder in its current form.
You need to reconstitute it.
Which is just a fancy word for “add liquid and mix it up.”
But Here’s Where Most People Mess Up…
They think it’s no big deal. Just squirt some water in there and call it good, right?
Wrong.
Do it wrong and you could:
- Destroy the peptide’s structure (making it useless)
- Contaminate the solution (hello, bacterial growth)
- Get your concentration math wrong (so you’re either under-dosing or way over-dosing)
- Waste an expensive vial that you can’t get back
So Let Me Walk You Through This The RIGHT Way
Because I’ve done this hundreds of times. I’ve made the mistakes. I’ve learned what works and what doesn’t.
And I’m going to save you from learning the hard way.
What You Actually Need (Don’t Skip Any Of This)
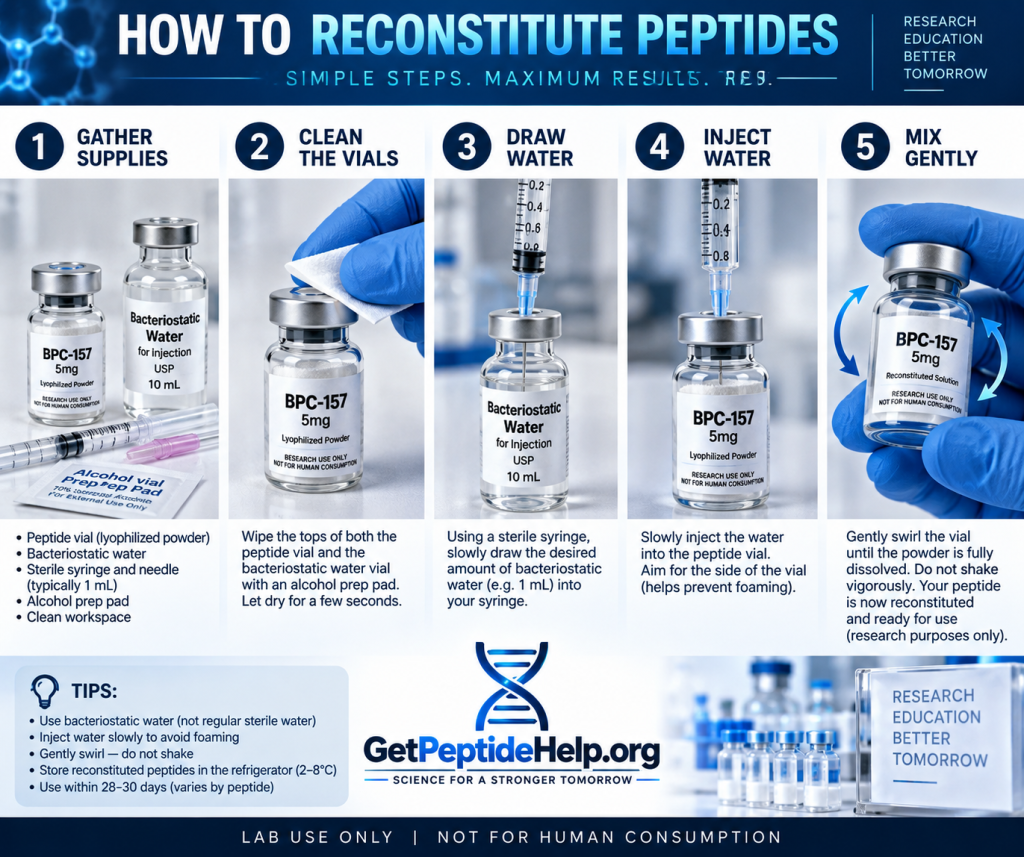
1. Your peptide vial (obviously)
2. Bacteriostatic water – NOT regular water, NOT sterile water, bacteriostatic water with 0.9% benzyl alcohol
Why? Because that benzyl alcohol stops bacteria from throwing a party in your vial. Regular water? Your reconstituted peptide is garbage within days.
3. Alcohol swabs – the cheap ones from any pharmacy work fine
4. Sterile syringes – insulin syringes are perfect because they’re designed for precise small volumes
5. A Peptide calculator – because if you suck at math like most people, you don’t want to wing this part
The Step-By-Step Process (Do It Exactly Like This)
Step 1: Clean Everything
Seriously. Wipe down the rubber stoppers on BOTH vials (your peptide and your bacteriostatic water) with an alcohol swab.
This isn’t optional. This isn’t overkill.
You’re about to stick needles through those stoppers. Unless you want to inject random bacteria into your expensive peptide, CLEAN THEM.
Step 2: Draw Up Your Bacteriostatic Water
Decide how much you’re adding (we’ll get to the math in a second).
Insert your sterile syringe into the bacteriostatic water vial and draw up the amount you need.
Step 3: Here’s The Critical Part Most People Screw Up
When you add the water to your peptide vial, DON’T just jam the needle in and blast water directly onto the powder like you’re putting out a fire.
Instead:
- Insert the needle at an angle
- Aim for the GLASS WALL of the vial, not the powder
- Let the water run slowly down the side
Why? Because peptides are delicate little things. Blast them with water and you’ll cause foaming, you’ll damage the molecular structure, and you’ll turn your expensive research compound into expensive garbage.
Step 4: Let It Dissolve (Patience, Grasshopper)
Once the water’s in there, just… wait.
Gently swirl it if you want. But DON’T shake it like a protein shaker.
Most peptides dissolve completely within a few minutes. Some take a bit longer. Give it time.
Step 5: Inspect Your Work
Look at the solution. It should be clear.
If it’s cloudy, if there’s visible chunks floating around, if it looks weird – STOP. Don’t use it. Something went wrong.
A properly reconstituted peptide looks like clean water. That’s it.
Now For The Math Part (And Why Most People Get This Wrong)
This is where you figure out how much bacteriostatic water to add and how much to draw up each time you use it.
Here’s the formula (it’s actually simple once you see it):
Concentration = Total peptide amount ÷ Volume of water you added
Let’s say you’ve got a 5mg vial (that’s 5,000 mcg – we’re converting to mcg because it makes the math easier).
You decide to add 2mL of bacteriostatic water.
Your concentration is: 5,000mcg ÷ 2mL = 2,500 mcg per mL
Now you know exactly what you’re working with.
Then, when you need to figure out how much to draw up:
Volume to draw = Amount you want ÷ Concentration
So if your protocol calls for 250mcg, and your concentration is 2,500mcg/mL:
250mcg ÷ 2,500mcg/mL = 0.1mL
And here’s where it gets easier: most people use insulin syringes, which are marked in “units” where 100 units = 1mL.
So 0.1mL = 10 units on your insulin syringe.
Boom. Done. No guessing.
Storage: Don’t Let Your Hard Work Go To Waste
Once you’ve reconstituted your peptide, it’s living on borrowed time.
In the fridge (2–8°C / 36–46°F) – this is where it needs to live
Away from light – some peptides break down when exposed to light, so keep the vial in the box or wrap it in foil
How long is it good for? – Depends on the specific peptide, but generally you’re looking at days to a few weeks. Check the documentation that came with your peptide. Don’t just assume.
The powder BEFORE you reconstitute it? That stuff lasts way longer – often months or even years if stored properly (usually frozen). So don’t reconstitute more than you’ll use in the near term.
The Sterile Technique Thing (Yeah, It Actually Matters)
Bacteriostatic water slows down bacterial growth. It doesn’t eliminate it forever.
Which means every time you’re sloppy – touching the needle to a non-sterile surface, not swabbing the stopper, reusing needles – you’re introducing potential contamination.
And contaminated peptides aren’t just less effective.
They’re potentially DANGEROUS.
So:
- Swab the stopper every single time
- Use a fresh needle every time you access the vial
- Don’t let the needle touch anything that isn’t sterile
- Don’t be lazy about this stuff
Here’s What Separates The Amateurs From The People Getting Results
The amateurs rush through this. They eyeball measurements. They skip steps. They don’t do the math.
Then they wonder why their results suck.
The people actually getting transformative results? They take this seriously.
They understand that proper reconstitution is the foundation of everything that comes after.
You can have the highest quality peptide in the world, but if you reconstitute it wrong, it’s worthless.
This Is Your Investment We’re Talking About
You didn’t spend good money on peptides just to waste them because you couldn’t be bothered to follow a process.
You’re not doing this to “kinda sorta maybe” get results.
You’re doing this because you’re serious about changing your body, your health, your life.
And serious people do things the right way.
The Bottom Line
Reconstitution isn’t complicated. But it DOES require attention to detail.
Follow these steps exactly.
Do the math right.
Use sterile technique.
Store it properly.
Do that, and you’ve got a properly prepared peptide that’s ready to deliver the results you’re looking for.
Screw it up, and you’ve got an expensive vial of useless liquid that won’t do anything except disappoint you.
Your choice.
But now you know exactly what to do. No excuses. No confusion.
Just follow the process and get to work.
A note on this content: This page is for educational and research purposes only, not medical advice. It doesn’t diagnose, treat, or prevent any condition. Consult a licensed healthcare professional before making any health-related decisions.